
Yeah, I know this is a bit late for this year's Christmas but I reckon it's not too late for next year's! The latest issue of Flavours featured an excellent tips on decorating your Christmas cake - hassle free and dead easy.
- All you need to do is just cut out a stencil of any snowflakes pattern on a reasonably thick paper (yes, make sure it's thick enough to hold on the icing sugar), push a needle through the middle and stick the needle (together with the stencil, obviously) into the centre of the cake.
- For extra precaution, brush the stencil with some water to just slightly moisturise the surface so that the dusted sugar would stick on (instead of falling off onto the cake) when you remove the stencil.
- Using a fine sieve, dust some icing sugar onto the stencil and cake, making sure that the sugar covers the cake and forms clear edges of pattern along the stencil.

I made this
Victoria Sponge Cake for my neighbour's Christmas get-together and the simple, mess-free decoration looked very presentable as a gift or a potluck dish!
This decoration is also great for little cupcakes but I do find that the bigger your cake is (at least a 9-inch), the more elaborate pattern of stencils that you can experiment on. Try it for the next Christmas!

I caught an entry from
Rasa Malaysia recently that just sparked my extremely rare deep-frying mood. For the record, I hate deep-frying! Hot oils splashing around to the stove, counter and walls...ughh!!
Anyway, I'm glad I tried out the recipe coz it turned out real great! Not to mention that I learned a trick or two in folding up spring rolls for the first time! Here's my adapted recipe:
 The spring rolls after and before deep-frying
What you need:
For the filling:
- 6 shrimps, shelled, deveined, and chopped into small pieces
- 4 cloves garlic, chopped
- 1 small onion, chopped
- 1 mengkuang, shredded
- 1 carrot, shredded
- 6 long beans, chopped
- Salt, sugar and white pepper powder to taste
- A dash of soy sauce
- 25-30 frozen (or fresh) spring roll skins
- Oil for deep frying
Sealing paste:- 2 tbsp corn starch
- 5 tbsp of water
 The filling
Directions:
- Heat some extra virgin olive oil and stir fry the garlic and onion until aromatic.
- Add in the chopped shrimps, and stir for half a minute.
- Add in the shredded jicama, shredded carrot and long beans.
- Season with salt, pepper, sugar and cook for 10 minutes over medium heat.
- To assemble, lay a popiah skin on a clean cutting board. Put some filling in the middle.
- Fold in the two sides and roll up the wrapper tightly. Seal with the paste and deep dry over medium heat until golden brown.
- Drain on paper towels and serve immediately with Thai chili sauce!

As I'm currently in my final semester of gestation, this healthy, delicious brew had been a regular in my kitchen twice a week. I find that the supposedly "100% Pure" soy bean milk sold by the hawkers doesn't agree too well with my quesy digestion, what more the chemicals-laden version of Yeo's and Drinkho sold in supermarkets.
Therefore, going homemade is the only way to be! I learned the method of making soy bean milk from my mom... and I found there are many western recipes on the internet that sound so outlandish and weird - what, adding vanilla essense and malt powder into soy bean milk?? No way!
What you need:- 500g soy bean, soaked overnight
- 4 or more daun pandan (screwpine leaves), shredded lengthwise and knotted
- 250g rock cane sugar
- 4-5 litres of water

Directions:
- Remove the hulls from soaked soy beans for better extraction.
- In a blender, blend the soy beans by batches with water until fine.
- Using a muslin cloth strainer, strain out the milk into a big pot from the bean curd.
- Cook the pot of milk over slow fire together with the sugar and daun pandan until the daun pandan changed colour (this will take about 45 minutes).
Note: My husband and I love the fragrance of daun pandan, so I usually use much more than 4 leaves; about half a bunch of 45sen daun pandan from Tesco which has 8-12 leaves!

I saw this spanking recipe from
Lilian's a few months ago and had been making it twice since. If you love nasi lemak, this is something you should try at home because then you'll realise how much you've been cheated from those you bought outside!
The rice turned out fluffy with the most fragrant aroma from the coconut milk and pandan leaves. I promise you, this is not a nasi lemak that you can get anywhere other than your own kitchen!
What you need:
- 200 ml coconut milk
- 3 cups of rice (ideally, wash and soak the rice in the water for 2 hours before cooking so that it is easier to cook)
- 3 cups water
- 1 tsp fenugreek (biji halba)
- 1 inch of ginger, smashed
- 1 shallot, quartered
- 4 pandan leaves, torn lengthwise into strips and knotted
- 1/2 tsp salt
- A little chicken granules (optional)

Directions:Just put everything into the rice cooker and cook like you usually cook rice, but do keep an eye on it. What I did was open up the lid and stir the ingredients every once a while to ensure full incorporation of the coconut milk.
Sometimes the rice is still half-cooked after the button popped up - add some water, cook again and keep on checking/stirring the rice. I served my nasi lemak with Yeo's curry chicken and a hard-boiled egg. Absolutely yummy!

The first time I tasted the soup, it reminded me of the delicious ginger tea that swanky spas like
Sembunyi,
Martha Tilaar and
Indrani will serve their clients after and before treatments.
I absolutely adored those ginger tea and was really thrilled that I accidentally duplicated the taste from this Chinese thongsui that is said to be good for pregnant ladies as it get rids of flatulence...and the recipe is drop dead simple too!

What you need:
- 1 sweet potato, cut into chunks
- A big piece of ginger, crushed
- A fistful (or more) of cane sugar
- 2 pandan leaves, torn lengtwise into strips then knotted
- 1 litre of water
Directions:
Before going to bed, just dump everything into a slow cooker and and you'll have a delicious ginger tea (with sweet potatoes, hehehe) ala 5-star spas in the morning! You can adjust the taste to your preference. If you prefer thick broth with pungent aroma of the ginger, use less water and more crushed ginger.

The pictures don't look as appetising as the ones I saw in
thebakerwhocooks.blogspot.com because I baked my cupcakes for too long in an oven that was too hot! Hope to bake another batch real soon that looks exactly just like in Cheryl's
post . (I love the "watery" look of Nutella even though the cake looks a bit pale)
I didn't use Nutella though, I used another brand of chocolate spread called JW Milk that tasted just as good.
What you need:- 140 g butter, softened
- 3/4 cup white sugar
- 3 eggs
- 1/2 tsp vanilla
- 200 g sifted all-purpose flour
- 1/4 tsp salt
- 2 tsp baking powder
- Nutella, approx. 1/3 cup
 Directions:
- Preheat oven to 160deg Celcius. Line 12-hole muffin tins with papercups.
- Cream together butter and sugar until light for about 2 minutes.
- Add in eggs one at a time, until fully incorporated. Don't worry if the batter doesn't look smooth.
- Add vanilla. Stir in flour, salt and baking powder until batter is uniform and no flour remains.
- Using an ice cream scoop, fill each papercup with batter.
- Top each cake with 1 1/2 tsp Nutella. Swirl Nutella in with a toothpick, making sure to fold a bit of batter up over the nutella.
- Bake for 20 minutes.Remove to a wire rack to cool completely. Makes 12.

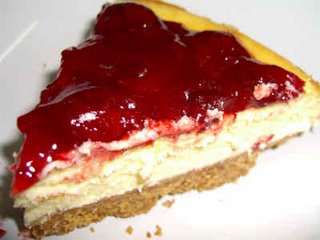
This cheesecake is very dense and heavy; I really prefer the earlier cheesecake that I blogged. However, the effect of alternating the chocolate and regular batter for this recipe is really ingenius!
The top of my cheesecake didn't turn out as it was intended to be (check out the original version and recipe of Bulls Eye Cheesecake
here). My slightly altered recipe used sweetened creamer instead of condensed milk because I happened to have a can of it stored in my pantry!
What you need:
For the base:
- 250g crushed digestive biscuit crumbs
- 1/4 cup brown sugar
- 120g butter, melted
For the cheese filling:
- 500g cream cheese, at room temperature
- 1 can sweetened creamer or condensed milk
- 3 eggs
- 125g cooking chocolate, melted
- Juice of 1 lemon (or a few drops of vanilla essense if you prefer)

Directions:
- Preheat oven to 170deg Celcius. Combine crumbs, sugar and butter; press firmly on bottom of 9-inch springform or loose bottom pan.
- Bake for 10 minutes, then turn down the oven to 150deg Celcius.
- Beat cream cheese in large bowl until fluffy.
- Spoon half the batter into melted chocolate, blend well.
- Add in the lemon juice to the other half of the batter, blend well.
- Pour alternately the chocolate and lemon batter into the middle of prepared crust.
- Bake for 50 - 55 minutes or until centre is slightly jiggly but perimeter is set.
- Cool for 1 hour and chill at least 4 hours to allow flavours develop.

Yeah, my first attempt in waffle making which turned out to be 67.952% satisfactory I would say. Couldn't resist not making this since I have the waffle making plate in the 4-in-1 Snack Maker Machine from Cosway. I googled for "crispy waffle" and
this was the first result I got.
I followed the exact
recipe but you might want to reduce the yeast a little since I found the smell was pretty overpowering.
What you need:- 1 tsp. instant yeast (Not to be confused with active dry yeast. Make sure it says "Instant")
- 2-1/4 cups flour
- 2 tbsp sugar
- 1/2 tsp salt
- 1 stick (that's 2 oz. or 113.5g to be exact) butter, melted, then cooled
- 2 cups warm whole milk
- 2 tsp. vanilla extract
- 2 eggs, separated

Directions:
- Stir together the dry ingredients: flour, yeast, sugar and salt. Stir the melted butter into the dry ingredients. Stir in the warm milk and vanilla until combined.
- Cover with plastic wrap. Leave overnight out on the counter.
- The next morning, the batter should look frothy. Heat and grease waffle iron.
- Add the egg yolks to the batter. Whip the egg whites to stiff peaks and fold carefully into the batter. This batter will rise a little more than usual, so test out a waffle or two before you really get started.
Note: For really crispy waffle, don't pour too much batter into the iron and serve immediately with whatever trimmings that you fancy!

I was looking for a muffin recipe that doesn't require any cooking oil or too much butter and I found Blueberry Muffin in
Kuali.com. However, I used raspberry filling and chocolate chips instead. Due to the low fat content, the muffins were not very fluffy and they're best finished eaten on the day itself!
What you need:- 175g plain flour
- 2 tsp baking powder
- 1/4 tsp salt
- 2 eggs
- 50g butter, melted
- 170ml UHT milk
- 1/2 tsp vanilla essence
- Dollops of raspberry filling
- Chocolate chips, as much as you like

Directions:
- Sift the flour, baking powder and salt together. Line a 12-cup muffin pan with paper cups. Preheat oven to 200 ºC.
- Whisk eggs until blended, then add the melted butter, essence and milk. Stir well into combine.
- Make a well in the centre of the sifted ingredients and pour in the egg mixture. Use a large metal spoon to stir until the flour is moistened and not lumpy or until the mixture becomes smooth.
- Spoon half the batter into 6 muffin cups, then drop a dollop of raspberry filling into each. Use a skewer to swirl the raspberry into the batter.
- For the second half of the batter, mix well the chocolate chips into it. Spoon into the remaining muffin cups.
- Bake in a preheated oven for 20 to 25 minutes or until the muffins spring back when they are pressed lightly. Again, best eaten on the day of baking itself!

This is a no-brainer yet delicious cookies that you can make with small children! Just melt 250g dark cooking chocolate in a microwave oven or double boiler (with 50g butter if you prefer your cookies less chocolatey and more buttery), then stir in enough cornflakes to coat.
Guaranteed yummy and foolproof! You can also try other variations with white chocolate or strawberry chocolate (available at baking specialty shops)/.


A nice recipe adapted from
kuali.com that's not exactly cooked in a claypot!
What you need:- 2 cups of rice, washed
- 1 piece of salted tenggiri fish in oil
- 6 black mushrooms, soaked till soft and halfed
- 4 pieces of chicken thighs & drums, chopped
- 5 cloves of garlic, minced
- 2 inches ginger, crushed
- 1 tsp light soy sauce
- 1 tsp sugar
- 1/4 tsp pepper
- 1 tbsp Maggi chicken stock concentrate
- 1/2 tsp dark soy sauce
Marinade for chicken:
- 2 tbsp light soy sauce
- 2 tbsp oyster sauce
- 1/4 tsp pepper
- 2 tsp sugar
- 2 tbsp sesame oil
- 2 tsp cornflour

Directions:
- Marinade the pieces of chicken for 30 minutes.
- Mash up the salted fish in 1 tbsp of its oil. Season with some sugar and pepper before mixing it into the rice. Add some water into the rice, stir and cook on the electric cooker as usual.
- Heat 1 tbsp oil in a wok and stir-fry the garlic and crushed ginger before adding in the marinated chicken meat. Season with light soy sauce, sugar, pepper, stock concentrate and dark soy sauce.
- Add the mushroom slices and keep on stirring until the chicken is cooked. Add a little water if it's too dry.
- When the rice is almost cooked and dry, add stir-fried chicken meat and continue to cook till rice is completely cooked. Dish rice into a serving bowl and garnish with chilli strips and chopped spring onions. Best serve when hot!

This is my first attempt in bread making. I'm not sure if this recipe that's adapted from
kuali.com was supposed to turned out to be crunchy, thin crust, but mine sure did!
What you need:
Pizza dough:
- 120g plain flour
- 120g high protein flour
- 1 tsp instant yeast
- 1 tbsp olive oil
- 150-160ml lukewarm water
- 1/4 tsp salt
Topping: - 250g deboned chicken meat, cubed small
- Half a can of sweetened pineapple, cubed
- 1 onion, thinly sliced into rings
- 1 tomato, thinly sliced into rings
- 2-3 tbsp tomato puree (I used ketchup)
- A good amount of grated mozarella and cheddar/parmesan/smoked cheese
- Pinch of pepper, salt, dried thyme & oregano
 Directions:
- Marinade the chicken with the seasonings and set it aside.
- Sift plain flour and high protein flour into a mixing bowl. Fit machine with a dough blade. Add in yeast and combine olive oil and salt that had been mixed with lukewarm water.
- Beat mixture for two to three minutes or until a smooth dough is formed.Cover the dough and set aside to stand for 35 to 40 minutes. Knock down the dough and place it on a lightly floured tabletop. Knead by hand for two to three minutes. Roll out dough to fit a 28-30cm pizza tray or pan and brush the surface with a little olive oil.
- Bake in preheated oven at 180 degree Celcius for 10 minutes. Remove dough out to cool slightly.
- Meanwhile, stir-fry the marinated chicken with some minced garlic and olive oil until it changed colour. Spread tomato puree/ketchup on dough base. Arrange some grated cheddar (or other cheese) evenly over the tomato base.Top up with cooked chicken meat and the rest of the ingredients. Top with mozzarella and cheddar cheese. Bake in preheated oven at 200 ºC or until dough is golden and the cheese melts. Serve hot!

My biggest achievement to date, this is a definite keeper recipe to be passed down the generations. Adapted from Rachael, thelazychef.wordpress.com, the cheesecake never failed to turn out perfect - I made it THREE times in TWO weeks!
You can get the ingredients i.e. cream cheese, strawberry/blueberry filling and loose bottom/springform baking pan from baking specialty shops as the prices there are so much more cheaper compared to the hyper and supermarts.
From Chang Thung S/B (No. 26, Jalan SS24/13, Taman Megah, Petaling Jaya) and Bake With Yen (30 & 32, Persiaran Puteri Satu, Bandar Puteri, Puchong) the Kraft's Philadelphia cream cheese retails for only RM9.00 per 500g bar. For the fruit fillings, I love those from BEST23 Baking Essential Supplies (57 Jalan USJ 8/2B, Subang Jaya) as you can find many whole fruits in it; retails at RM5.6o per 300g jar.
What you need:
For the base:
- 250g digestive biscuits, finely crushed
- 120g butter
For the cheese filling:
- 375g cream cheese
- 110g castor sugar
- 2 medium eggs
- 60ml lemon juice from 2 lemons
- 100ml dairy whipping cream
- 1 tbsp cornflour, sifted
- Grated rind from 1 lemon
- Topping: 200g strawberry or blueberry filling
 Directions:
- Prepare an 8-inch loose bottom or springform round cake tin. Wrap loose base of tin with aluminium foil.
- To prepare base, melt butter. You can use more butter for a base that's harder and firmer. Use a little of the melted butter to lightly grease bottom and sides of cake tin.
- Add melted butter into the crushed biscuits and stir until crumbs are moistened by butter. Transfer crumbs to the prepared cake tin. Press crumbs until it is flat and compact.
- Place the tin with the crumbs into a preheated 180 degree Celcius oven and bake for 10~12 minutes.
- Cream cheese and castor sugar until light and smooth. Add eggs one at a time, incorporate it well into cream cheese mixture after each addition. Do not overbeat the eggs.
- Add juice, lemon rind and whipping cream. Beat well.
- Finally, fold in sifted cornflour and grated rind into batter.
- Pour cream cheese mixture over cooled biscuit base. Tap sides of cake tin a little to break large, noticeable air bubbles on the surface of filling.
- Bake cheesecake using top and bottom heat of oven at 170degree Celcius for 30-35 minutes or until side of cheesecake has browned a bit but the middle is still a little jiggly.
- Leave to cool. Run a thin knife blade carefully around inside rim of tin to loosen the sides of cheesecake. Remove cheesecake from cake tin. Unwrap aluminium foil from base of cake tin. Transfer the whole cheesecake, with the aluminium foil, to a cake board. Wrap aluminium foil over the cake board.
- Allow to cool and spoon strawberry or blueberry filling over the top of the cake. Refrigerate cheesecake overnight.
Note: Make sure you wrap the aluminium foil upwards around the loose base tin, as the butter from the base might drip onto your oven, especially if you're using extra butter for a base that doesn't crumble easily.

A smashing breakfast for two - just pop everything into a slow cooker! The glutinous rice gave the congee a luxurious texture just like those in the chinese dim-sum shops. Recipe by
Lilian, malaysiabest.net
What you need:- Half a cup of normal rice
- One small handful of glutinous rice (soak for a while)
- 4 cups of water, or more
- One century egg, chopped
- One salted egg, boiled and chopped
- Two dried scallops or one small dried squid
- Salt and pepper to taste
- Meat (chopped) and bones from two chicken thighs or drumsticks
- Seasoning for the meat: A dash of soy sauce, sesame oil, Chinese cooking wine, pepper and a bit of cornflour

Directions:
- Put everything in the slow cooker, including the chicken bones but not the chicken meat.
Season the meat overnight - cover and refigerate. - The next morning, add in the chicken meat and turn off heat when the meat is cooked.
- Adjust the consistency of the congee, add more water if necessary.
- Remove the bones and serve with sliced spring onions and jullienned young gingers. For extra treat, boil annother salted duck egg, chop and sprinkle on the porridge.

A dessert that's neither too sweet nor oily. Recipe by
Lilian, malaysiabest.netWhat you need:For the pudding:- 25 dates, pitted
- 1 cup hot water
- 200g self-raising flour
- 50g butter
- 100g soft brown sugar (looks like castor sugar but only brown in colour)
- 2 eggs
For the butterscotch sauce:- 100g soft brown sugar
- 200 ml whipping cream
- 1 tsp vanilla essence or butta vanilla
- 1 tbsp butter

Directions:
To make the pudding:
- Blend the dates in a blender with hot water to form a paste.
- Cream sugar and butter till fluffy.
- Sieve in the flour, add the date paste and eggs alternately. Mix well. The batter should be creamy and smooth; add a little more water if it is too dry.
- Bake baine marie style: put the batter into one baking tin and put that thin over another bigger tin filled with water. Bake for 45 minutes in 180 degree celcius oven.
To make the butterscoth sauce:
- Just put all the ingredients in a saucepan and cook over low fire until it just started to boil. Turn off heat and serve warm with the pudding!
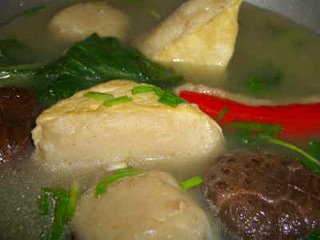
A very nice alternative recipe for a change. Recipe inspired and adapted from
Lilian, malaysiabest.net
What you need:
For fish balls and yong tau foo stuffings:
- 600 gram tenggiri slabs with bones
- 1 tsp salt and pepper to taste
- 4 tbsp cornflour
For yong tau foo soup:
- 2 handfuls of ikan bilis
- Pepper and sesame oil to taste
- 2 firm pan-fried taukwa (firm white beancurd), cut into halves and slit in the middle to make small pockets
- A few big red chillies and a few dry shitake mushroom

Directions:
- Using a blunt edged spoon, scrape off the tenggiri flesh from its bone. Keep the bones for soup.
- In a bowl, mix the salt, pepper and cornflour with about 8 tbsp of water. Mince the scraped flesh with this mixture in a food processor. Add more cornflour if the flesh is too soggy.
- Wet your fingers and shape the flesh into balls. For yong tau foo, stuff the flesh into mushrooms (soaked and stems removed), big red chillies (de-seeded and sliced open lengthwise) or firm beancurds.
- To prepare yong tau foo soup, boil the fish bones with 2 handfuls of ikan bilis. Season with pepper and sesame oil. Drop in the yong tau foo and fish balls after the soup had boiled and simmer for at least half an hour. Add in a bunch of chopped choy sum when the yong tau foo are cooked and before turning off the heat!

An easy, filling dish for the lazy Sundays. Recipe serves four, adapted from Zu, quickneasytreats.blogspot.com
What you need:
- 3 medium or large Russet potatoes, cooked and sliced thinly
- 2 tomatoes, cubed
- 1 onion, chopped
- 1 can tuna in brine
- 2 tbsp chopped corriander leaves
- 2 tbsp mayonnaise
- 1oo ml whipping cream
- Shredded cheddar and mozzarella cheese for topping
- Sprinklings of bread or biscuit crumbs
- White pepper to season

Directions:
- Preheat oven to 180 degree celsius and greased a large casserole dish with butter
- In a bowl, mix together the tuna, tomatoes, onion, corriander and mayonnaise. Season with pepper.
- Arrange 1/3 of the sliced, cooked potatoes at the bottom of the dish, followed by half of the tuna mixture.
- Sprinkle a layer of shredded cheese and alternate with another potato and tuna layer. Finish with the last 1/3 of sliced potatoes.
- Pour cream over the gratin and sprinkle shredded cheese generously over the cream. Top with bread or biscuit crumbs for the extra crunch and sweetness.
- Bake in the oven for about 20 minutes till the top is golden brown. Serve warm with salad.

This is an excellent recipe adapted from Flavours magazine issue September-October 2004. The result tastes absolutely professional even for first-timer!
What you need:
Taro dough: - 600g taro, peeled and sliced
- 1/4 tsp five spice powder
- 4 tsp sugar
- 1 tsp pepper
- 90 g wheat or tapioca starch
- 110g vegetable shortening
Filling:
- 2 cloves garlic, chopped
- 300g chicken or pork meat, cubed and mixed with 1 tbsp cornflour and a pinch of pepper
- 100g prawns, chopped coarsely
- 1 big onion, cubed
- 2 tbsp canned green peas
Seasonings:
- 1 tbsp oyster sauce
- 1 tsp dark soy sauce
- 1/2 tsp salt, or to taste
- 1 tbsp sugar, or to taste
- A pinch of pepper
- A pinch of five spice powder
- 500ml oil for deep frying

Directions:
To prepare the taro dough:
Steam taro for 15 minutes until soft. Combine the taro, five spice powder, sugar, salt and pepper. Mash well. Work in the wheat/tapioca starch and shortening to form a dough. Chill for 30 minutes.
To prepare filling:
Heat 1 tbsp oil in a wok to saute the garlic until fragrant. Add chicken/pork and chopped prawns. Mix in seasonings and saute until the meat is cooked before adding the onion cubes and green peas. Turn off heat and aside to cool.
To shape puffs:
Divide dough to form balls about the size of golf balls. Flatten dough slightly and place a heaped tbsp of filling in the centre. Wrap the dough around the filling. Roll into oblong shape, chill.
Heat the oil in a wok until very hot. When it starts to smoke, lower several taro puffs into the oil . The puff will fluff up if the oil hot enough. Lower heat and deep fry until golden brown. Drain on paper towels and serve warm.


A nice, comforting creamy dessert. Recipe by
Zu, quickneasytreats.blogspot.com
What you need:
- 1 packet jelly powder (10-13 gram per pack)
- 1 litre water
- 250g sugar
- 1 cup evaporated milk
- 100ml whipping cream
- 3-4 tbsp cocoa powder
- 3-4 tbsp hot water
- 10 or more crushed Oreo biscuits
Directions:
- Heat the jelly powder, water and sugar over the stove.
- When the jelly powder and sugar have dissolved, add evaporated milk and leave it to boil, stirring occassionally with a balloon whisk.
- Once agar-agar mixture boils, remove it from the heat and stir and let it cool slightly
- Melt the cocoa powder with 1 tbsp hot water at a time, mix it till well blend. Then, whip whipping cream till soft peak forms.
- Add whipped cream slowly into the jelly. Stir the mixture, then add the cocoa mixture and stir till well blended. Pour half of the mixture into the jelly mould and let it set for about 5-10 minutes
- Sprinkle generously the crushed oreos and slowly pour the other half of the mixture into the mould
- Let the agar-agar cool before keeping it in the fridge to set. Serve chilled.

A recipe adapted from
Bella Cookbook, Issue March/April 2004. Looks just like fried chicken minus the gallons of oil!
What you need:- 100g fresh bread or biscuit crumbs
- 1 tbsp plain flour
- 1 tsp ground cumin
- 1 tsp chilli powder
- 1 tsp paprika
- 2 tsp fresh chopped coriander
- Half a cup of natural yoghurt
- 12 chicken drumstikcs
- Dashes of olive oil
 Directions:
- Preheat the oven to 200 degree Celcius. Mix together the crumbs, flour, cumin, chilli powder, paprika and fresh coriander. Spread the mixture on a shallow plate.
- Pour the yoghurt into another plate. Dip the chicken drumsticks frist in the yoghurt, then in the crumb mixture to coat evenly. (Note: You can make some diagonal cuts over the drumsticks' flesh to help it cook more thoroughly later)
- Place the drumsticks on a lightly oiled baking tray. Drizzle with olive oil.
- Bake for 45-50 minutes until golden, crisp and cooked through. Serve with potato wedges, green salad and mayonnaise!

A so much more healthier alternative to french fries - and tastes equally as good too if not better! Inspired by
Rachael, thelazychef.wordpress.comWhat you need:
- 3 or 4 US potatoes
- Salt
- Extra virgin olive oil
Directions:
- Preheat your oven to 220 degrees celcius. Peel and cut the potatoes into wedges - quarter them up, then half the quarter.
- Put them into a pot of water to get rid of extra starch. Soak for 1o minutes, rinse and drain well.
- Return the potatoes into a pot on stove with enough water to cover them. Add 1/2 tsp salt and bring to boil. Once it boils, reduce heat & simmer for 3 minutess. Drain the potatoes well & pat dry on kitchen paper towels.
- Place the potatoes strips on a large baking sheet; do not overcrowd. Sprinkle olive oil generously over them. Gently toss the potatoes to mix well with the oil.
- Bake in the oven for 15 minutes. Remove baking sheet and turn the wedges over & continue to roast for another 15 mins or until it´s well browned & crisp.
- Remove from oven & immediately sprinkle with salt over the hot wedges & serve immediately with ketchup or mayonnaise.
 Yeah, I know this is a bit late for this year's Christmas but I reckon it's not too late for next year's! The latest issue of Flavours featured an excellent tips on decorating your Christmas cake - hassle free and dead easy.
 I made this Victoria Sponge Cake for my neighbour's Christmas get-together and the simple, mess-free decoration looked very presentable as a gift or a potluck dish!


