
This is a pretty interesting recipe I got from
Malaysia Best. Lilian had blogged about this cake so many times that I finally decided to try it myself too!
The result was a pretty unique tasting cake unlike any I've tasted before. For those who find the normal buttery cake a bit "jelak", you might want to give this a try. I know it's just pure psychology, but I couldn't help feeling this cake is somewhat "healthier" compared to the regular ones. Originally, the cake is topped with some thick, white lemon icing syrup, which in my case, turned out to be a failure as I added too much water! (
see the wet bottom of my cake?)
 What you need:
- 125 g unsalted butter, softened
- 125 g caster sugar
- 4 eggs
- Juice and grated rind of 1 lemon
- 130 g self-raising flour, sifted
- 50 g blue poppy seeds (available in specialty shops)
- 180 g ground almond
Directions:
- Preheat the oven to 180 deg Celcius.
- Cream the butter and caster sugar until light and fluffy.
- Beat in the eggs one by one.
- Add in the lemon juice and rind, beat.
- Using a wooden spatula, fold in the sifted flour.
- Then mix in the ground almond and poppy seeds. Stir until everything is evenly incorporated.
- Pour into an 8-inch pan and bake in the oven for about 40 minutes.
Note: To make the icing, I would suggest you mix a few tablespoon of icing sugar with the juice of one lemon and cook it on double boil over slow fire. Remember, it's best you don't add any extra water! Good luck! ;-)

Yeah, I know this is a bit late for this year's Christmas but I reckon it's not too late for next year's! The latest issue of Flavours featured an excellent tips on decorating your Christmas cake - hassle free and dead easy.
- All you need to do is just cut out a stencil of any snowflakes pattern on a reasonably thick paper (yes, make sure it's thick enough to hold on the icing sugar), push a needle through the middle and stick the needle (together with the stencil, obviously) into the centre of the cake.
- For extra precaution, brush the stencil with some water to just slightly moisturise the surface so that the dusted sugar would stick on (instead of falling off onto the cake) when you remove the stencil.
- Using a fine sieve, dust some icing sugar onto the stencil and cake, making sure that the sugar covers the cake and forms clear edges of pattern along the stencil.

I made this
Victoria Sponge Cake for my neighbour's Christmas get-together and the simple, mess-free decoration looked very presentable as a gift or a potluck dish!
This decoration is also great for little cupcakes but I do find that the bigger your cake is (at least a 9-inch), the more elaborate pattern of stencils that you can experiment on. Try it for the next Christmas!

The pictures don't look as appetising as the ones I saw in
thebakerwhocooks.blogspot.com because I baked my cupcakes for too long in an oven that was too hot! Hope to bake another batch real soon that looks exactly just like in Cheryl's
post . (I love the "watery" look of Nutella even though the cake looks a bit pale)
I didn't use Nutella though, I used another brand of chocolate spread called JW Milk that tasted just as good.
What you need:- 140 g butter, softened
- 3/4 cup white sugar
- 3 eggs
- 1/2 tsp vanilla
- 200 g sifted all-purpose flour
- 1/4 tsp salt
- 2 tsp baking powder
- Nutella, approx. 1/3 cup
 Directions:
- Preheat oven to 160deg Celcius. Line 12-hole muffin tins with papercups.
- Cream together butter and sugar until light for about 2 minutes.
- Add in eggs one at a time, until fully incorporated. Don't worry if the batter doesn't look smooth.
- Add vanilla. Stir in flour, salt and baking powder until batter is uniform and no flour remains.
- Using an ice cream scoop, fill each papercup with batter.
- Top each cake with 1 1/2 tsp Nutella. Swirl Nutella in with a toothpick, making sure to fold a bit of batter up over the nutella.
- Bake for 20 minutes.Remove to a wire rack to cool completely. Makes 12.

This cheesecake is very dense and heavy; I really prefer the earlier cheesecake that I blogged. However, the effect of alternating the chocolate and regular batter for this recipe is really ingenius!
The top of my cheesecake didn't turn out as it was intended to be (check out the original version and recipe of Bulls Eye Cheesecake
here). My slightly altered recipe used sweetened creamer instead of condensed milk because I happened to have a can of it stored in my pantry!
What you need:
For the base:
- 250g crushed digestive biscuit crumbs
- 1/4 cup brown sugar
- 120g butter, melted
For the cheese filling:
- 500g cream cheese, at room temperature
- 1 can sweetened creamer or condensed milk
- 3 eggs
- 125g cooking chocolate, melted
- Juice of 1 lemon (or a few drops of vanilla essense if you prefer)

Directions:
- Preheat oven to 170deg Celcius. Combine crumbs, sugar and butter; press firmly on bottom of 9-inch springform or loose bottom pan.
- Bake for 10 minutes, then turn down the oven to 150deg Celcius.
- Beat cream cheese in large bowl until fluffy.
- Spoon half the batter into melted chocolate, blend well.
- Add in the lemon juice to the other half of the batter, blend well.
- Pour alternately the chocolate and lemon batter into the middle of prepared crust.
- Bake for 50 - 55 minutes or until centre is slightly jiggly but perimeter is set.
- Cool for 1 hour and chill at least 4 hours to allow flavours develop.

I was looking for a muffin recipe that doesn't require any cooking oil or too much butter and I found Blueberry Muffin in
Kuali.com. However, I used raspberry filling and chocolate chips instead. Due to the low fat content, the muffins were not very fluffy and they're best finished eaten on the day itself!
What you need:- 175g plain flour
- 2 tsp baking powder
- 1/4 tsp salt
- 2 eggs
- 50g butter, melted
- 170ml UHT milk
- 1/2 tsp vanilla essence
- Dollops of raspberry filling
- Chocolate chips, as much as you like

Directions:
- Sift the flour, baking powder and salt together. Line a 12-cup muffin pan with paper cups. Preheat oven to 200 ºC.
- Whisk eggs until blended, then add the melted butter, essence and milk. Stir well into combine.
- Make a well in the centre of the sifted ingredients and pour in the egg mixture. Use a large metal spoon to stir until the flour is moistened and not lumpy or until the mixture becomes smooth.
- Spoon half the batter into 6 muffin cups, then drop a dollop of raspberry filling into each. Use a skewer to swirl the raspberry into the batter.
- For the second half of the batter, mix well the chocolate chips into it. Spoon into the remaining muffin cups.
- Bake in a preheated oven for 20 to 25 minutes or until the muffins spring back when they are pressed lightly. Again, best eaten on the day of baking itself!

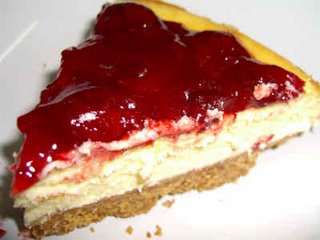
My biggest achievement to date, this is a definite keeper recipe to be passed down the generations. Adapted from Rachael, thelazychef.wordpress.com, the cheesecake never failed to turn out perfect - I made it THREE times in TWO weeks!
You can get the ingredients i.e. cream cheese, strawberry/blueberry filling and loose bottom/springform baking pan from baking specialty shops as the prices there are so much more cheaper compared to the hyper and supermarts.
From Chang Thung S/B (No. 26, Jalan SS24/13, Taman Megah, Petaling Jaya) and Bake With Yen (30 & 32, Persiaran Puteri Satu, Bandar Puteri, Puchong) the Kraft's Philadelphia cream cheese retails for only RM9.00 per 500g bar. For the fruit fillings, I love those from BEST23 Baking Essential Supplies (57 Jalan USJ 8/2B, Subang Jaya) as you can find many whole fruits in it; retails at RM5.6o per 300g jar.
What you need:
For the base:
- 250g digestive biscuits, finely crushed
- 120g butter
For the cheese filling:
- 375g cream cheese
- 110g castor sugar
- 2 medium eggs
- 60ml lemon juice from 2 lemons
- 100ml dairy whipping cream
- 1 tbsp cornflour, sifted
- Grated rind from 1 lemon
- Topping: 200g strawberry or blueberry filling
 Directions:
- Prepare an 8-inch loose bottom or springform round cake tin. Wrap loose base of tin with aluminium foil.
- To prepare base, melt butter. You can use more butter for a base that's harder and firmer. Use a little of the melted butter to lightly grease bottom and sides of cake tin.
- Add melted butter into the crushed biscuits and stir until crumbs are moistened by butter. Transfer crumbs to the prepared cake tin. Press crumbs until it is flat and compact.
- Place the tin with the crumbs into a preheated 180 degree Celcius oven and bake for 10~12 minutes.
- Cream cheese and castor sugar until light and smooth. Add eggs one at a time, incorporate it well into cream cheese mixture after each addition. Do not overbeat the eggs.
- Add juice, lemon rind and whipping cream. Beat well.
- Finally, fold in sifted cornflour and grated rind into batter.
- Pour cream cheese mixture over cooled biscuit base. Tap sides of cake tin a little to break large, noticeable air bubbles on the surface of filling.
- Bake cheesecake using top and bottom heat of oven at 170degree Celcius for 30-35 minutes or until side of cheesecake has browned a bit but the middle is still a little jiggly.
- Leave to cool. Run a thin knife blade carefully around inside rim of tin to loosen the sides of cheesecake. Remove cheesecake from cake tin. Unwrap aluminium foil from base of cake tin. Transfer the whole cheesecake, with the aluminium foil, to a cake board. Wrap aluminium foil over the cake board.
- Allow to cool and spoon strawberry or blueberry filling over the top of the cake. Refrigerate cheesecake overnight.
Note: Make sure you wrap the aluminium foil upwards around the loose base tin, as the butter from the base might drip onto your oven, especially if you're using extra butter for a base that doesn't crumble easily.
 This is a pretty interesting recipe I got from Malaysia Best. Lilian had blogged about this cake so many times that I finally decided to try it myself too!
 What you need:


